Manual · Production
Script, timeline & director stage
Script and shot assets; arranging, subtitling and exporting on the final timeline; canvas and world elements; and blocking, animation recording and Gaussian splats on the 3D director stage.
9. Script & shots
9.1 Script assets
Generate and edit script content through the node graph. Connect the result to “script output” and pick a suitable text model and prompt in the parameter panel. Script assets can be dragged into other graphs as upstream.
9.2 Shot assets
- A shot (beat) replaces the old storyboard: narrative is organized per shot, then broken down and generated into camera-ready shots.
- Shot breakdown (storyboard artist · beat breakdown table): splits time / space / characters / action / conflict / atmosphere columns out of the script.
- Shot table: view and edit breakdown results in bulk; rows can be added and deleted, and double-clicking the node opens the table window.
- Shot generation / shot reference: generate content per shot in bulk, or reference a specific shot to keep working; combined with the Episode Pipeline's 9-grid / 4-grid storyboard tables and motion video generation, this completes the whole short-drama chain.
9.3 Storyboard thinking and prompt presets
The old standalone “storyboard asset / camera blocking” has been removed — storyboarding now lives in shots and the Episode Pipeline: the beat breakdown table splits shots, the 9-grid / 4-grid storyboard tables turn shots into camera setups you can generate, and images and video come from generation nodes.
- Camera language: hero / mysterious entrance, two-shot medium, over-the-shoulder reverse, high angle, from behind, Dutch angle, and more.
- Body orientation: full front, 45° front, pure profile, 45° back and strict back.
- Acting: anger, dissociation, mania, relief, anxiety, sadness, confidence and surprise broken down into facial, breathing, shoulder / neck, finger and weight-shift movement.
- Lighting: top light, frontal side light, Rembrandt, volumetric, backlight and motivated light sources inside the frame.
- Ad camera moves and transitions: impact hard cut, flash to white, motion match, short dissolve, match cut, foreground occlusion, rack-focus reveal, jump cut and product hero reveal.
The prompt presets of video and image generation nodes (storyboard artist · beat breakdown table / 9-grid storyboard table / 4-grid motion storyboard table, …) write this camera language straight into the prompt; the frame pulling node can grab key frames from a reference video first, then use segment reshoot for local changes — see the Node graph chapter.
10. Final timeline
The final timeline assembles shot / video node outputs and imported media into a timeline you can preview and export; it's usually opened on a script asset.
10.1 Opening and layout
- Open the final timeline editor from a script-related flow (left: media library · center: preview · bottom: multi-track timeline).
- Track types: video · picture-in-picture · voice-over · subtitles · music.
- The media library header can refresh inputs and auto-place on tracks (laying media onto tracks in order), and the media display size is adjustable.
10.2 Left-side media
- Node inputs: video / audio collected from upstream nodes. They can't be deleted from the list (deleting a track clip doesn't affect the list).
- Imported media: appears here after being dragged into the timeline from the asset library or your file system. It can be deleted, which also removes the matching clips from tracks.
- In the import area right-click to create a group; groups can be renamed and deleted (deleting one returns its media to “Ungrouped”). Drag imported items into a group or back to “Ungrouped”. Groups are saved with the timeline document.
- Video media icons use the first-frame thumbnail; audio media shows a generic audio icon.
10.3 Placing and arranging
- Drag from the list onto a track to place it; audio dropped on a video track lands on the voice-over track automatically. “Auto-place on tracks” also spreads everything out in one click.
- Clips on tracks can be dragged left / right to change timing, or moved to another track; double-click a clip to preview / locate it.
- Clip actions: split at the playhead, copy / paste (pasted at the playhead), remove clip. The properties panel fine-tunes start time / clip duration / volume, and audio clips support fade in / fade out.
- Track management: hide / show, lock / unlock, collapse / expand; drag a track edge to change its height; “Total duration” sets the timeline length (it can't be shorter than the content). The timeline has its own undo / redo.
- Subtitle track: you can add subtitles and edit their text.
10.4 Playback
- Center preview playback: plays only the currently selected video or audio clip (the button is disabled when no media clip is selected).
- Bottom timeline toolbar playback: plays the whole timeline (video sequence + audio tracks) with return to start, pause, loop and speed settings.
10.5 Picture-in-picture and transitions
- Picture-in-picture overlay: drag a video onto the preview overlay to layer it as PiP; the properties panel adjusts horizontal / vertical position, width / height, opacity and volume (resettable in one click). The preview frame can follow the original video or the export aspect ratio, and PiP is composited on export.
- Transitions: a blue handle appears where two clips overlap on a video track — drag it to adjust the overlap / transition length. In / out transition effects include dissolve, fade in / out, A fade out / B fade in, flash white, slide left / right / up / down, wipe left / right / up / down and circle open / circle close, all composited on export.
10.6 Subtitles
- Select a subtitle clip and edit the text, font size, height (vertical position), color and style in the properties panel; scrolling the wheel while a clip is selected also changes the font size.
- Subtitles are exported with the film, and can also be exported separately as an SRT file.
10.7 Export
The timeline toolbar offers Export film: set the resolution (preset or custom width / height), frame rate and bitrate. It prefers the local ffmpeg to mux an MP4 and falls back to WebM recording when ffmpeg isn't installed. Export progress and the result path are reported in the UI. Use “Fit width” to zoom the timeline.
11. Canvas & world elements
11.1 Canvas assets
- Free canvas: a blank node canvas — right-click to add nodes, or drag assets in from the asset library. Creating another yields “Free Canvas 2” and so on. To build video generation and reference video on a canvas, see Free canvas: video generation & reference video.
11.2 World elements / shots
- Table view: world elements are character / scene / prop / weapon; the shot table has time / space / characters / action / conflict / atmosphere columns. Rows can be added and deleted.
- Double-clicking the matching node opens the extraction / breakdown prompt, the table or the editing window.
12. Director stage
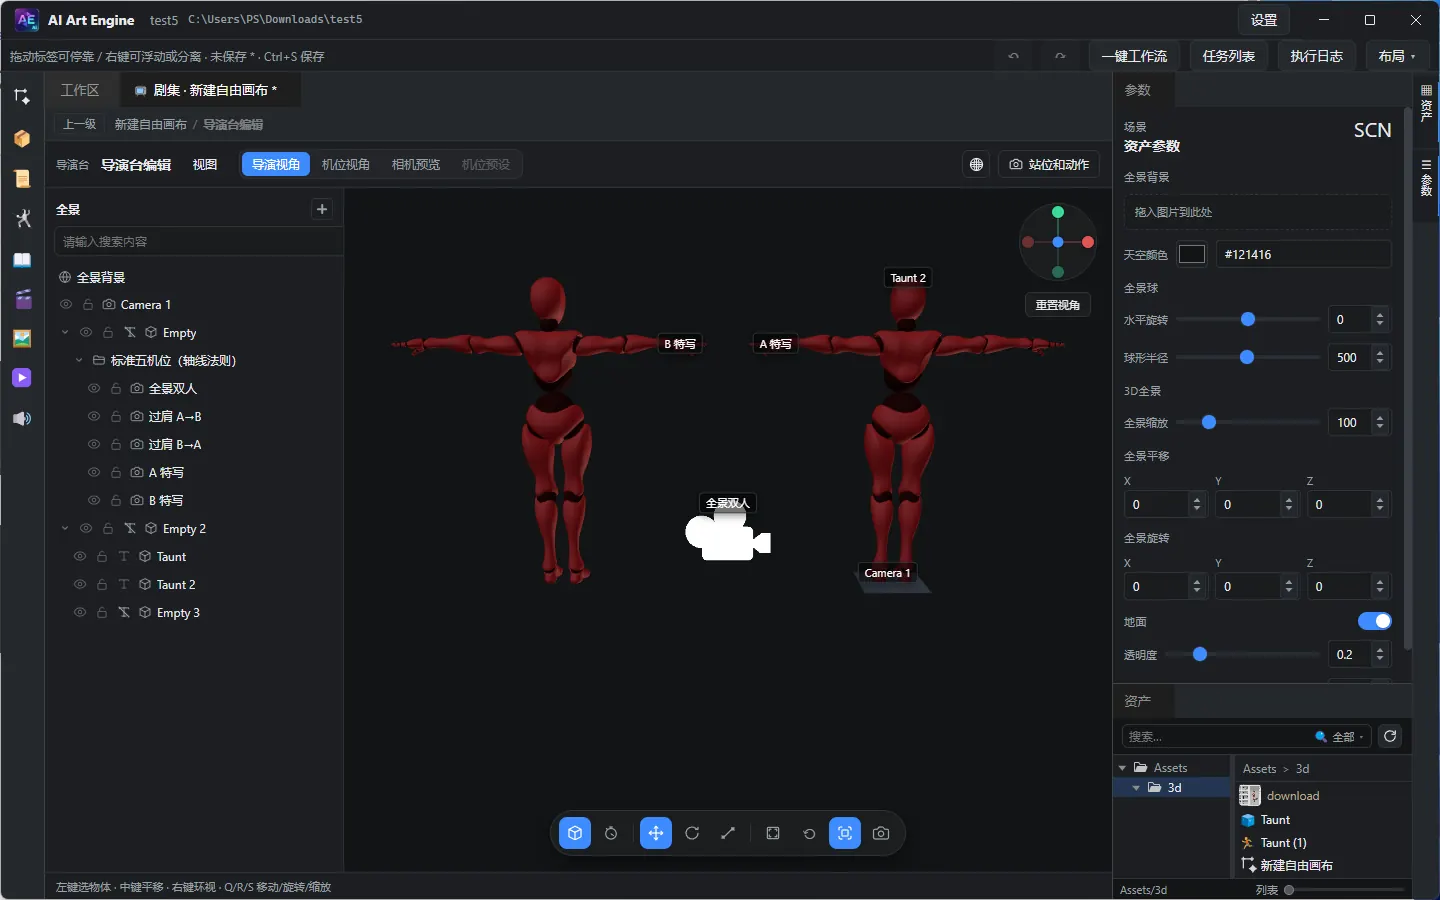
The director stage handles 3D posing, cameras, animation preview and recording. The node chain is usually “director stage edit → (optional) select / downstream generation”. The edit node offers two square outputs (blocking shots and motion captures) and two kinds of input: a 3D model input port — connect a 3D model generation result and diving into the stage instantiates it into the scene automatically; and a panorama input port — connect a panorama image and it becomes the stage background when you dive in.
12.1 Open from a node
- Double-click a “director stage edit” node in the node graph to open the stage window.
-
After closing the stage or syncing, results are written to the node:
out-shots(blocking shots,images) andout-actions(motion captures,videos). - The node Inspector previews blocking thumbnails and motion videos (double-click for the media preview).
12.2 Viewport controls
- Left button selects · middle button pans · hold the right button for fly-through: W/A/S/D to move, Q/E to descend / ascend, Shift to accelerate, mouse to look.
- Q / R / S: move / rotate / scale tools.
- Bottom viewport toolbar: panorama / animation mode switch, aspect ratio (Auto follows the viewport size, or fixed 21:9 / 16:9 / 4:3 / 1:1 / 3:4 / 9:16 — it affects preview and capture framing), a selection bounds toggle, screenshot and reset view.
12.3 Sidebar and objects
- Left scene list: hierarchy, search, create camera / empty object / primitives (cube, sphere, cylinder, pointed arch, torus, plane, … 20+); drag the right edge to resize the list (remembered locally).
- AI blockout: provide perspective / 360 panorama references (up to 3) plus a prompt, and a text model builds a scene blockout from primitives — a quick way to lock down perspective and spatial layout.
- Objects: delete, hide, show name, lock; drag to reparent. The hierarchy supports multi-select batch delete and multi-select drag to reparent (moving the whole group while preserving world transforms); camera groups can be deleted as a group, preset cameras included, and it's undoable.
- Properties · pose (FK / IK, AI pose — generate bone rotations from natural language, common pose presets) · material texture override: replace an object's base / normal map, with options to remove or hide a texture slot, or restore the model's own textures in one click.
12.4 Blocking and motion
The “Blocking & motion” button in the title bar opens a panel with two categories:
- Blocking: viewport screenshot history. Capture with the toolbar camera button; double-click a thumbnail to preview it.
-
Motion: videos recorded in animation mode. After a successful recording it's
written to the project's
Cache/Videos/automatically (no directory picker) and the Motion category opens.
12.5 Views and panorama
- Director view / camera switching; six-way views; reset.
- Shading mode: the shading menu at the right of the title bar offers shaded / wireframe / shaded wireframe (solid with a wireframe overlay) for checking topology, intersections and occlusion. The choice is remembered locally; the default is shaded.
- Gizmos display: the Gizmos menu at the right of the title bar adjusts gizmo size and toggles scene text, camera gizmos, the grid and selection bounds. “Include scene text / camera names in captures and video” decides whether blocking shots and motion recordings overlay those labels.
- Move to view: Ctrl+Alt+F; align with view: Ctrl+Shift+F.
- Panorama: drag in a background image and adjust zoom / pan / rotation, plus ground and sky colors.
- You can also connect a panorama to the director stage node's panorama input port (single image); diving into the stage then sets it as the background automatically, with no manual drag needed.
12.6 Animation mode and recording
- Switch between panorama mode and animation mode.
- Tracks and keyframes: K adds a keyframe, Delete removes one, and Space plays / pauses.
- The red dot button in the animation panel is record motion: it records the current animation to WebM, saves it to the cache directory automatically and adds it to the Motion list.
12.7 Gaussian splats (.spz / .ply)
Splats come from the spatial world chain, and they can also enter the stage as model assets — rendered, positioned, and included in blocking shots and motion recordings:
-
Two sources: the
*.spzthat spatial world generation writes next to the world automatically (free, preferred), or the*.plyconverted synchronously by the “World export” node (billed separately, written as a same-name sibling of the world GLB). PLY is not registered as an asset — connect its relative path straight to the director stage's 3D model input port, or import it into the asset library first. - It enters the stage like any other model: drag the splat model asset onto the stage viewport, or wire it into the director stage node's 3D model input port (diving into the stage instantiates it automatically).
- Rendering is handled by the bundled Spark renderer: a splat is an ordinary object in the scene hierarchy — selectable, movable / rotatable / scalable, parentable, hideable and renameable, using the same transform tools and selection bounds as a GLB character. The asset inspector's 3D preview and the asset card thumbnail render splats too.
- The World export node's inspector carries the same 3D preview pane plus an artifact list: after exporting the HQ mesh or the PLY splats you can orbit the result, and the list also shows the world's own gaussian splats (SPZ) and 360 panorama.
- The “Skeleton” tab is meaningless for a splat: there are no bones and it takes no part in retargeting, so an empty bone list is expected.
- The splat renderer loads on demand: previews and stages without splats never load it. Splats are read in asynchronously, so a freshly opened stage may show nothing for a moment before they appear.
What works
- Transforms, visibility, renaming, reparenting and locking — exactly like any other object.
- Colour in the properties tints the whole splat (it shifts the splat's own hue), rather than swapping a material's base colour as it does for regular models.
- Blocking shots and motion recordings render it into the frame like anything else.
What does not work (a splat has no triangle mesh and no texture materials, so these tools do not apply)
- Pose and skeletal animation: there are no bones, it takes no part in retargeting, and the animation panel lists no skeleton clips for it.
- Material texture override: no replaceable texture slots appear.
- The wireframe / shaded wireframe shading modes: splats always shade their own way.